Friday, November 21, 2014

Increase Weblogic memory in Integrated Weblogic server of Jdeveloper

Go to JDEV_HOME\system12.1.2.0.40.66.68\DefaultDomain\bin and open setDomainEnv.cmd  or setDomainEnv.sh based on whether it is a windows or linux machine.

Scroll down until you see WLS_MEM_ARGS, below that enter

In the case of Windows:
set USER_MEM_ARGS = -Xms64m  -Xmx2048m  -XX:MaxPermSize=1024m

In the case of Linux:
USER_MEM_ARGS="-Xms64m  -Xmx2048m  -XX:MaxPermSize=1024m"
export USER_MEM_ARGS

Sunday, November 16, 2014

Calling a web service using wsimport from a proxy internet connection

When you try to access a basic web service using the wsimport command from your system to a valid web service over a proxy network there is a chance that you might be getting the below error

[ERROR] Connection timed out: connect

Failed to read the WSDL document: http://www.webservicex.net/geoipservice.asmx?W
SDL, because 1) could not find the document; /2) the document could not be read;
 3) the root element of the document is not <wsdl:definitions>.


[ERROR] failed.noservice=Could not find wsdl:service in the provided WSDL(s):

 At least one WSDL with at least one service definition needs to be provided.


        Failed to parse the WSDL.


To resolve this issue you should specify the proxy server host and port also along with the wsimport command.

>wsimport -httpproxy:<Proxy Host>:<Proxy Port> http://www.webservicex.net/geoipservice.asmx?WSDL

Then the wsimport will work fine.

Thanks.

Thursday, October 23, 2014

ADF Train Template

The ADF Train Model is helpful in creating wizard like model where the user can traverse through a series of steps in creating a new entity. For example, in the case of adding a new employee to the Payroll or HR system, there can a wizard kind of model with multiple pages which gets information related to the employee like, Basic Information, Educational Information, Work experience information and so on and so forth. 

Think of a scenario where this wizard model should be consistent across multiple entity creation scenario, like if the user wants to add the employee into a particular project, or a relocation has to be made, everywhere we need this wizard model and the page looks similar everywhere, just that the number of steps and the fields inside the pages gets changing. For achieving this we can create a Train/Wizard template. Wizard is a term used in a desktop application, like in JDeveloper for creating a new Application we traverse through multiple steps like, Application Name, Project 1 Name, Project 1 Java settings etc...

The main things we need to take care of is 
1. Page Template
2. Train TaskFlow
3. Fields


1. Page Template

The page template for the wizard which we create will be a .jspx page.

We can create the page template by Right-clicking on the project and creating an ADF Page template and create a page template.
  • In Document type radio button we should select JSP XML
  • Template Content can be a Blank Template
  • Facet Definition and attribute is where we define our dynamic part and the attributes which we use to control the behaviour of the contents placed in our template. Facet is a portion inside our template where we add the fields which we need respective to each and every individual page of our train. Attributes are like variables we define in our page template so by setting these attributes in the page we can change the behaviour of the Non-editable part of our page.
  • Create page definition is necessary if you are passing any parameters from your Datamodel to the page. Its optional.

After creating the page template we need to add two namespaces for adding the facets and attributes tags in our page template


xmlns:f="http://java.sun.com/jsf/core" 
xmlns:afc="http://xmlns.oracle.com/adf/faces/rich/component"

The train template will contain some basic components like Train (obviously), Back and Next buttons. There will be facet called "fields" (as per this example) which will be where you will put your faces components needed for each page/fragment.


2. Train Taskflow

The train task flow can be created like any other bounded task flow

While creating the views inside the train task flow, you will see that there is train-stop for each and every view.As shown below

  For this train stop we can define the display Name such that it appears on the train component 


This display Name can be set as shown below


This display Name will be picked up by the af:commandNavigationItem inside the template whose text value is set as

text="#{controllerContext.currentViewPort.taskFlowContext.taskFlowTrainModel.currentStop.localActivityId}"
The back and Next buttons are also set with action which will be based on the the train task flow. For Back button the action will be
action="#{controllerContext.currentViewPort.taskFlowContext.trainModel.getPrevious}"
For Next button the action will be
action="#{controllerContext.currentViewPort.taskFlowContext.trainModel.getNext}"

3. Fields

The fields which are specific to the particular page will be added inside the fields facet

We create page fragments view1.jsff and view2.jsff based on the Reference ADF Page Template "Train Template"

After creating the page fragments you drag and drop the fields which you want to show on the page inside the "fields" facet.


For the view1 you need to set the title on the page and disable the back button and enable next button while rendering both the buttons

This is done adding the below xml in your fragment


The attributes backRendered, backDisabled, backDisabled, nextDisabled and title are defined in the page template.

These attributes are used for setting different properties of different components on the page template.

the Rendered property of Back button is set like:
rendered="#{attrs.backRendered}"

The title of the panel Header is set like:
text="#{attrs.title}"

So attributes help is setting the properties of different components in the Page template and the attributes will also be declared inside the Page template as :

                <afc:attribute>
                    <afc:attribute-name>title</afc:attribute-name>
                    <afc:attribute-class>java.lang.String</afc:attribute-class>
                </afc:attribute>

                <afc:attribute>
                    <afc:attribute-name>backRendered</afc:attribute-name>
                    <afc:attribute-class>java.lang.Boolean</afc:attribute-class>
                </afc:attribute>


Friday, February 28, 2014

How to display schema size with SQL query in Oracle?


SELECT sum(bytes)
  FROM dba_segments
 WHERE owner = <<owner of schema>>
If you are logged in to the schema then,
 SELECT SUM(bytes) FROM user_segments

Wednesday, February 19, 2014

How to find the Class/Object which invoke a method ?


Throwable t = new Throwable(); 
StackTraceElement[] elements = t.getStackTrace(); 
String calleeMethod = elements[0].getMethodName(); 
String callerMethodName = elements[1].getMethodName(); 
String callerClassName = elements[1].getClassName(); 

Saturday, February 15, 2014

How to Set send from in mail session


Use the setFrom() method:
Session mailSession = Session.getInstance(props, null);
MimeMessage message = new MimeMessage(mailSession);
message.setFrom(new InternetAddress("sendingaddress@company.com"));

How to over ride Netbeans wizard toolbar save button function?


Read here :

https://blogs.oracle.com/geertjan/entry/bye_savecookie_hello_org_netbeans

How to import data into a user when another user with same data exists


Facing ORA-39151 error while trying to import data into a user when there is another user with same tables ??


Answer


impdp user/password DUMPFILE=file_name directory=dir LOGFILE=test.log REMAP_SCHEMA=USERA:USERB TABLE_EXISTS_ACTION=APPEND
USER A is the existing user USER B is the new user

How to get the selected row of a tree table?


//TreeViewer viewer use your viewer
IStructuredSelection selection = (IStructuredSelection)viewer.getSelection();

How to auto adjust window size based on Image size in Java Swing


1. Put image as Icon / ImageIcon to the JLabel then
  • Test for MaximumSize for JFrame that returned Toolkit for concrete monitor
  • If PreferedSize is lower than MaximumSize size then call JFrame#pack()
  • otherwise have to call setSize()

2.Put image as Icon / ImageIcon by using Custom Painting to theJComponentJPanelJLabel e.i. then
  • then this JComponent must to returns PreferredSize
    a) call JFrame#pack() if PreferedSize is lower than MaximumSize,
    b) otherwise have to call JFrame#setSize()
    c) by assume that you don't use Image#getScalledInstance

3.Use Icon in the JLabel, there is only one issue that image can be smaller then expected size on the screen, but no issue with that, is pretty possible to centering image to the JLabel.CENTERto the JLabel

Wednesday, February 12, 2014

How to setup Apache Tomcat Server in Netbeans.


Tomcat 7 is a Servlet Container – a fairly light weight container, very convenient for development and testing. While not a full application server, Tomcat implements the functionality described in the Java Enterprise Edition Web profile specifications. Most notably, it supports version 3.0 of the Servlet API (application programming interface) and version 2.2 of JavaServer Pages, both part of the recently ratified JEE 6.
Installing Tomcat 7 is dead-easy and configuring Tomcat as Server in NetBeans to allow direct (re)deployment of web applications from within NetBeans is just as easy. Still, a brief blog article explaining the steps – for even easier lives for Java Web developers. And as testimonial to the ease of use the development teams behind Tomcat and NetBeans provide to the world of Java developers.
Installation of Tomcat starts with downloading Tomcat, from the Apache site: http://tomcat.apache.org/download-70.cgi


After downloading the zip-file, I extracted it to c:\java (the location is of your own choosing though).

Next I turn to NetBeans to configure Tomcat 7 as a new server.
Open the Tools menu and select the option Servers:

The list of currently configured servers appears. Underneath is the big Add Server button. Press that button.


Select the type of Server to add and provide a name for it – just for reference within NetBeans.
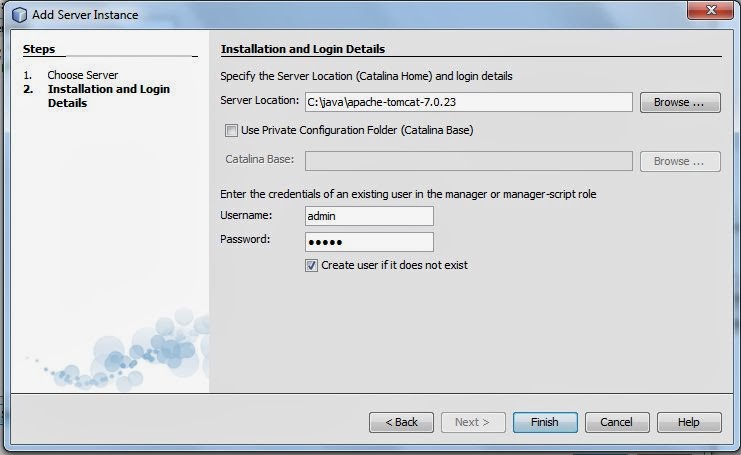

Press Next.


Provide the location where this server instance is installed – the target directory for the extraction of Tomcat 7. Also provide credentials for a Tomcat Administrator account ( in my case I used admin/admin).
Press Finish.
The newly configured Server is presented:


Press Close.
Now the Tomcat 7 Server can be started (and stopped, deployed to etc.) from within NetBeans. Open the Services Window (from the Window menu – option Services or using Ctrl-5).


The Tomcat output console appears in NetBeans:


After a few seconds, Tomcat is running. The home page can be accessed at http://server:port – in my case localhost and port 8085:


Tomcat is now ready to have applications deployed to it – for example from within NetBeans.
Note: in order for the admin user to also access the management console at http://localhost:8085/manager/html it is imperative that this user is granted the manager-gui role. This can be done by editing the tomcat-users.xml file in the conf directory of the Tomcat installation and adding this role. The entry for user admin would then become:
<user password=”admin” roles=”manager-script,admin,manager-gui” username=”admin”/>


http://technology.amis.nl/2012/01/02/installing-tomcat-7-and-configuring-as-server-in-netbeans/


Tuesday, February 11, 2014

How to put Conditional Breakpoints in Netbeans.

Conditional Breakpoints in NetBeans

As of NetBeans 6.x, most types of breakpoints (line, method, field, exception) can be conditioned by a user defined expression.
The expression is evaluated in the place of breakpoint hit and must be of boolean type.

Examples of conditions:
  • x > 1 && y < 10
  • text.equals(name)

In order to modify these conditions, open the "Breakpoint Properties" dialog using one of these methods:
  • Right-click the breakpoint and click Breakpoint > Properties
  • Open the Breakpoints window, right-click on the breakpoint and select Properties